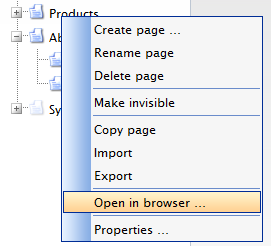
Page management
Create page
To create a new page you need to complete a two-step process.
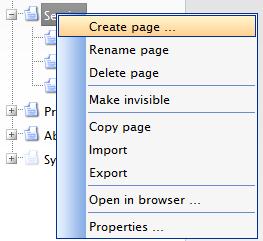
- Right click on the page in the Web Tree under which you want the new page to appear
- Select New Page from the menu that appears.
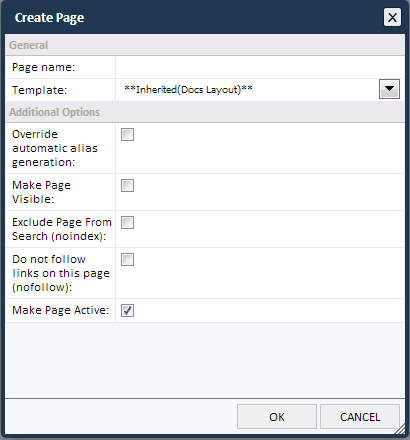
- A pop up window will appear.
- Fill in the name of the page "Page name".
- Choose a template from the drop down input "Template"
The following options are given in the check boxes under “Additional Options” :
- “Override automatic alias generation” - To overwrite the alias that otherwise would be created with the Name of the page, check the box.
- "Make Page Visible" - To make the page visible in the Web Tree
- "Exclude Page From Search - To exclude the page from the on-site search.
Rename page
- Right click on a page you want to rename.
- An option is given "Rename page".
- The pointer is moved to the page name and it's highlighted.
- Write a new name to replace with the older one.
- For the action to be confirmed, click anywhere outside of the box.
- Now an edit/pencil icon appears in front of the page name in the Web Tree.
- Please note, the page must be published for the new name to appear on the Web.

Move a page in the web tree
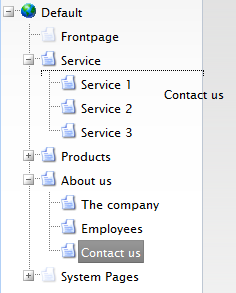 Pages can be moved by dragging and dropping them in the Web Tree. To do this follow these steps:
- Click on the name of the page that needs to be moved
- Hold down the mouse button and drag the page until you reach the desired location for the page in the Tree.
- A thin dotted line will appear over the name of the page once it is moved (this line indicates where the page will go to in the Tree).
- If the page is moved over other pages in the Web Tree then the page name of that page will appear in a grey box to indicate that the page that is being moved will become a sub page.
Note: Once a page has been moved in the Web Tree it needs to be published in order for the transfer to take place. The publishing button can be found in the upper left corner of the page.

Delete page
To delete a page in the Web Tree:
- Right click on the page name
- Choose “delete” from the menu.
- The page can be restored from the recycle bin if necessary.
- The recycle bin can be found in the main navigation under Content/Recycle bin.

Make page invisible
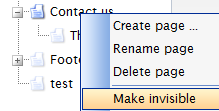 To make a page disappear from the navigation of the Website follow these steps:
- Right click on the page name and choose “make invisible”.
- The changes will take place once the page has been published.
- By clicking “Cancel changes” instead of “Publishing” on the page the changes will be discarded.
- To make a page visible again, right click on the page name and choose “make visible” from the menu.
Note: Even though a page is made invisible in the Web Tree and cannot be located in the Site's navigation, it can still be accessible in Search, both on search engines like Google.com and also in Site Search. The page properties menu gives the option to "Exclude Page From Search", this can be located by right-clicking on the page and selecting Properties from menu, the "Exclude Page From Search" can then be selected under the "Additional Options" section of the pop-up menu (see images at top of page). A more permanent solution would be to delete the page and then restore it once it can be published again.
Import
To import a page that you have exported from another website:
- Right click the page name you want the new page to be subpage off and press “Import”.
- A popup will appear where you can choose the file and upload it to the site.

Export
To export a page:
- Right click the page name and choose “Export”.
- A popup will appear where you can choose the destination for the exported page.

Open in browser
To get a clear overview on how the page will appear in a browser then:
- Right click the page name
- Choose “Open in browser” from the menu.
- Then a new window will appear which displays the chosen page without edit functionality.
